THM: Bounty Hacker Walkthrough
THM: Bounty Hacker Walkthrough of CTF
6/29/202614 min read


My Walkthrough of a Beginner-Friendly CTF Box
I have been spending a lot of my free time lately on hacking labs, and honestly it has become one of my favorite hobbies. There is something really satisfying about poking around a machine, finding small mistakes the admin left behind, and slowly working your way from knowing nothing about the box to having full root access on it. Today I want to share one such machine that I solved recently. It is a beginner level box, so if you are new to this field, this is a great write up to follow along with.
Before I start, let me just say that this kind of practice is extremely useful if you are trying to learn ethical hacking or penetration testing. You get to apply real tools in a safe and legal environment, and you also start understanding how small misconfigurations can lead to a complete system compromise. So without further delay, let's get into it.
Why Enumeration Matters So Much
If there is one thing I have learned from doing these boxes, it is that enumeration is everything. People who are new to this field often rush into trying exploits without even knowing what services are running on the target. That is the wrong approach. You should always start slow, gather as much information as possible, and only then think about attacking anything.
Enumeration basically means collecting information about your target. This includes open ports, running services, software versions, usernames, and anything else that might give you a hint about how the system works. The more information you gather at this stage, the easier the rest of the process becomes.
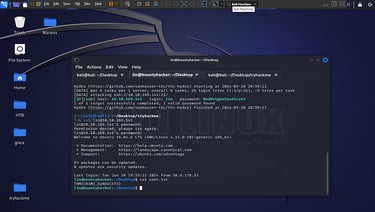
Step 1: Scanning the Target with Nmap
The very first tool I reach for whenever I start a new box is Nmap. It is basically the standard tool used by almost everyone in this field for network scanning. Nmap helps you discover open ports, the services running behind those ports, and sometimes even the exact version of the software being used.
The command I used here was:
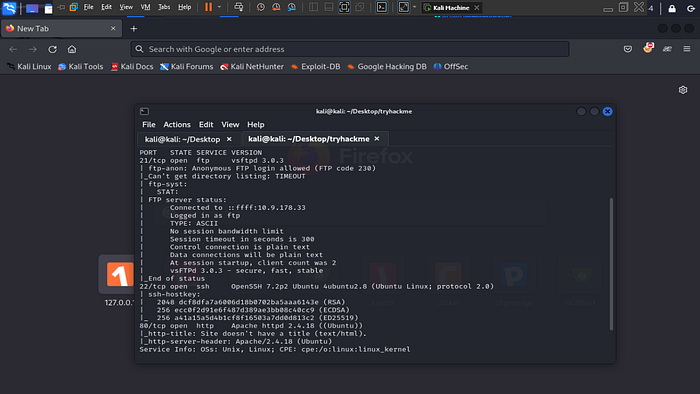
nmap -sV -sC <target-ip>
Let me break this down a little for anyone who is not familiar with these flags. The -sV flag tells Nmap to try and detect the version of the service running on each open port. This is useful because sometimes a specific version of a service has a known vulnerability, and knowing the exact version can save you a lot of time later. The -sC flag runs a bunch of default scripts that come bundled with Nmap. These scripts can reveal extra details like banner information, supported authentication methods, and more.
Once the scan finished, I got a list of open ports. Out of all of them, two services immediately grabbed my attention: an FTP service and an SSH service. Whenever I see FTP open on a box, my first instinct is always to check if anonymous login is allowed. A lot of system admins forget to disable this, and it is honestly one of the easiest ways to get an initial foothold on a machine.
Step 2: Exploring the FTP Service
So I went ahead and tried connecting to the FTP service using the anonymous login option. For anyone who does not know, FTP servers sometimes allow you to log in using the username anonymous and basically any password, or sometimes even an empty password. This is meant for public file sharing, but a lot of admins leave it enabled even when it should not be.
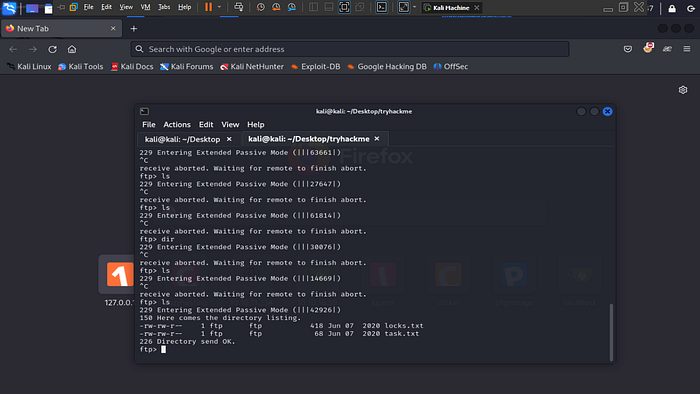
To my surprise, it worked right away. I was logged into the FTP server without needing any real credentials. Once inside, I started looking around to see what kind of files were sitting there, and I found two text files. Naturally, I wanted to get a closer look at both of them on my own machine, so I used the mget command to download everything at once.
mget *.txt
This command basically tells the FTP client to grab every file ending in .txt and copy it to my local system. After downloading both files, I opened them up to see what they contained.
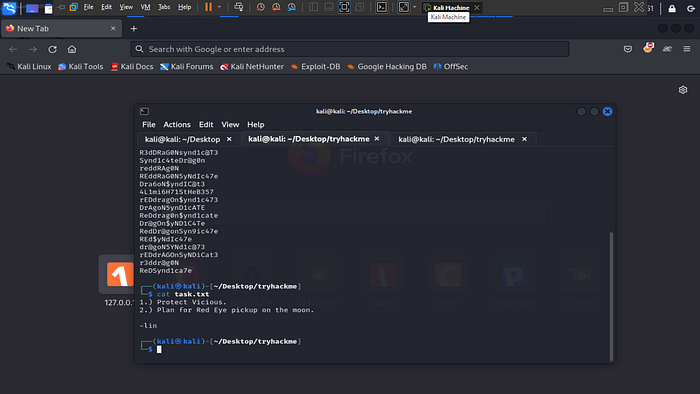
The first file looked like some kind of task list. It had a few lines written in it, almost like personal notes someone had jotted down while working on something, maybe configuring the server or just leaving reminders for themselves. Interestingly, this file also revealed who had written it, because the username of the person was mentioned somewhere inside.
Question: Who wrote the task list? Answer: A specific username was mentioned in the file. This username turned out to be very important later because it was the exact same one used to log into SSH.
The second file was very different from the first one. Instead of notes or reminders, it was just a long list of random looking words and phrases, one after another. At first I was not completely sure what this was for, but the structure made it pretty obvious after a moment of thinking. It looked exactly like a wordlist, the kind of file you would normally use with password cracking tools.
This is actually a really common pattern in these kinds of labs. The challenge creators love to hide small clues like this so that you have to connect the dots yourself instead of being told directly what to do.
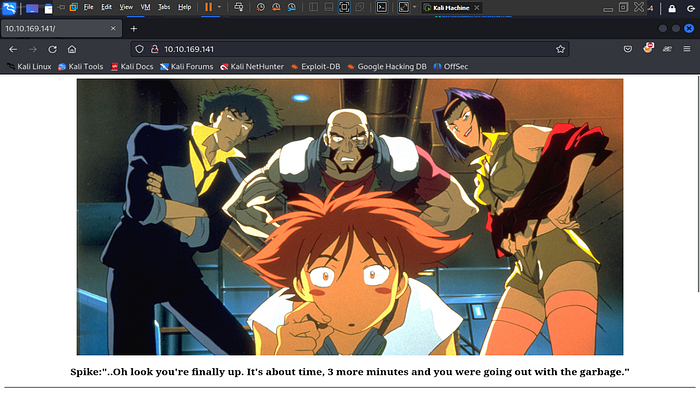
Step 3: Checking Out the Website
Since the Nmap scan also showed a web service running on the target, I figured it would be worth taking a quick look at it in the browser. Sometimes web applications have hidden directories, exposed configuration files, or even outdated software with known vulnerabilities that you can exploit directly.
Unfortunately, after browsing around for a bit, I did not find anything particularly interesting. There were no obvious hidden pages, no login forms with weak credentials, and nothing that screamed "exploit me." This happens sometimes. Not every open service on a box is meant to be your way in. Sometimes a service is just there as a distraction, or it might be relevant in a much later stage of the attack chain.
Since the website was not giving me anything useful right away, I decided to step back and think about the bigger picture. I went back to my Nmap scan results and reminded myself that SSH was also open on this machine. Suddenly, that wordlist file I downloaded earlier from FTP started to make a lot more sense.
Question: What service can you bruteforce using the text file we found? Answer: SSH
It clicked for me that the combination of a username from the task list file and a wordlist of possible passwords was basically everything I needed to attempt a brute force attack against the SSH service.
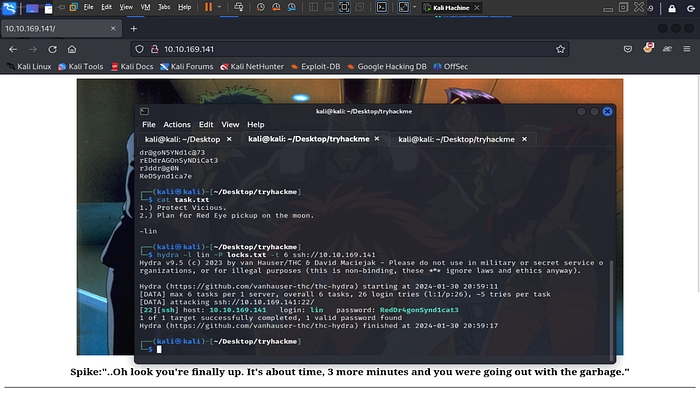
Step 4: Brute Forcing SSH Using Hydra
Brute forcing is a pretty old technique, but it still works surprisingly well, especially when you actually have a real username to target and a decent wordlist to try against it. Instead of guessing blindly, having both of these pieces of information narrows things down a lot and makes the attack realistic instead of random guessing.
For this part, I used a tool called Hydra. If you have not used it before, Hydra is basically a fast and flexible password cracking tool that supports a huge number of protocols, including SSH, FTP, HTTP forms, and many others. It is one of those tools that almost every penetration tester or CTF player ends up using at some point.
The command I ran looked something like this:
hydra -l <username> -P <wordlist-file> -t 6 ssh://<target-ip>
Let me explain the flags here as well, since understanding what each one does is more valuable than just copying commands blindly. The -l flag is used to specify a single username you want to test, as opposed to -L which would be used if you had a whole list of usernames to try. The -P flag points to the password wordlist file, which in this case was the file I downloaded earlier from FTP. The -t flag controls how many parallel connection attempts Hydra makes at once, which basically speeds up the process. I set it to six, which is a fairly safe number that balances speed without overwhelming the target service.
After letting Hydra run for a little while, it eventually found a valid combination. The username and password actually worked together, which meant I now had real credentials I could use to log into the system through SSH.
Question: What is the password for the user? Answer: The password that was found had kind of an edgy, syndicate themed feel to it, matching the overall hacker movie style vibe of this whole machine. It honestly fit the theme of the box pretty well, almost like the box creator wanted everything, the flags, the password, and the file names, to feel connected under one storyline.
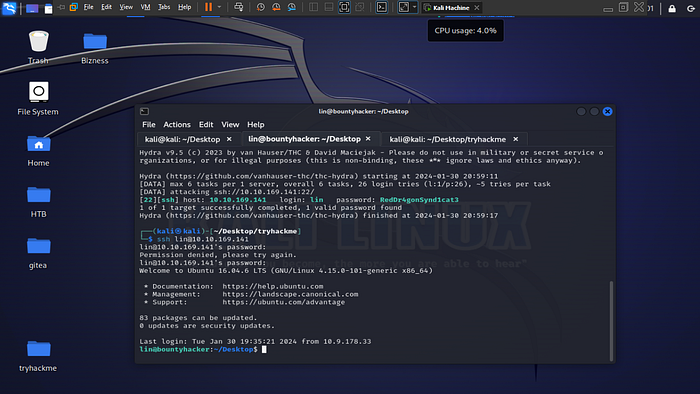
Step 5: Logging Into the Machine
With valid credentials finally in hand, the next logical step was to actually log into the machine using SSH. This is usually one of the most exciting parts of any CTF box for me, because it means you are no longer poking around from the outside, you are actually inside the system now.
ssh <username>@<target-ip>
After entering the password when prompted, I was dropped straight into a shell on the target machine. This is the moment where things start feeling real. You are no longer guessing or scanning, you have actual access to the file system, the processes, and everything else running on that box.
Once I was in, my first move was to check the home directory for the user I had just logged in as. In most beginner level rooms, the first flag is usually sitting right there waiting to be read.
cat user.txt
And sure enough, there it was, the first flag of this challenge. Getting the user flag always feels like a small win, even though I know the real challenge usually comes right after this, when you try to escalate your privileges to root.
Answer: The flag had a sort of crime themed wording inside the curly braces, again sticking with that syndicate style naming pattern from before.
Step 6: Hunting for Privilege Escalation
Getting user level access is great, but it is rarely the end goal. Almost every CTF box, and honestly almost every real world penetration test, has privilege escalation as a major part of the process. Your goal at this stage is to find some kind of misconfiguration, vulnerable binary, weak file permission, or scheduled task that you can abuse to elevate your access from a normal user all the way up to root.
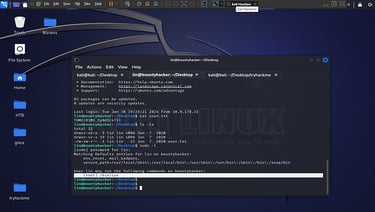
One of the very first things I always check after landing on a new box is whether the current user has any special sudo permissions. This is done with a simple command:
sudo -l
This command lists out any commands that the current user is allowed to run using sudo, along with any special conditions attached to them, like whether a password is required or not.
When I ran this command, I found something interesting. The user account I had access to was allowed to run a certain archiving binary as root, and it did not even require a password to do so. This is honestly one of those moments where experienced players immediately start smiling, because misconfigured sudo permissions like this are one of the most common and most reliable ways to escalate privileges on Linux systems.


Step 7: Using GTFOBins to Escalate Privileges
If you have spent any time at all in the world of penetration testing or CTF challenges, you have probably already heard of a website called GTFOBins. For those who have not come across it yet, GTFOBins is basically a giant curated list of common Unix and Linux binaries, along with documented ways that each one can be abused to bypass security restrictions, escalate privileges, or maintain access on a system.
The idea behind GTFOBins is actually pretty simple once you understand it. A lot of standard system binaries, the kind that come pre-installed on almost every Linux distribution, have hidden functionality that was never intended to be used for privilege escalation, but can still be abused that way if the binary is allowed to run with elevated permissions. If a binary like this is configured to run as root through sudo, and it does not properly drop its elevated privileges, then you can often trick it into spawning a shell that inherits those same root level permissions.
So naturally, since I knew exactly which binary I had sudo access to, I went straight to GTFOBins and searched for it. Sure enough, there was a dedicated section explaining exactly how this particular binary could be exploited when allowed to run under sudo.
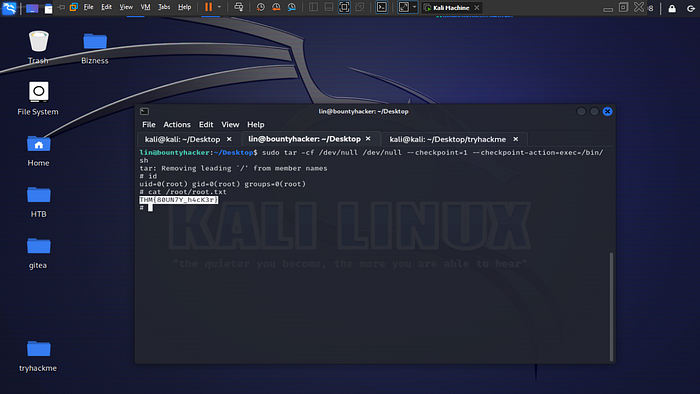
The documented technique for this binary involved using one of its built in features, specifically something related to checkpoint actions, to execute an arbitrary command. Since I had sudo rights over this binary, I could use this same trick to spawn a shell running with root privileges.
The command looked something like this:
sudo <binary> -cf /dev/null /dev/null --checkpoint=1 --checkpoint-action=exec=/bin/sh
Breaking this down a little, this command tricks the archiving utility into creating an empty archive while also triggering a checkpoint action after the very first step. Since the checkpoint action is configured to execute a shell, and the entire command is being run through sudo, the shell that gets spawned inherits full root privileges instead of staying limited to the original user account.
The moment I ran this command, my shell prompt changed, confirming that I now had root access on the system. This is always such a satisfying feeling, going from a regular limited user account to having complete control over the entire machine, all because of one small misconfigured sudo rule.
From there, grabbing the final flag was the easy part. Root users can access basically anything on the system, so finding and reading the root flag took only a few seconds.
Answer: The root flag also followed the same syndicate and crime themed naming style as the previous flag, which made the whole machine feel like a connected story rather than just random separate challenges thrown together.

Breaking Down the Full Attack Chain
Looking back at the entire process from start to finish, I think it is worth summarizing the full attack chain in a simple, easy to follow way, especially for anyone who might be newer to this kind of work.
First, a basic Nmap scan revealed three interesting services running on the target: FTP, a web server, and SSH. Second, anonymous login on FTP was enabled, which allowed access to two text files without needing any kind of authentication. Third, one of those files contained a username, while the other contained what looked like a password wordlist. Fourth, the website itself did not lead anywhere useful, which redirected attention back toward the SSH service instead. Fifth, using the username and wordlist together with Hydra, a valid SSH password was successfully brute forced. Sixth, logging in through SSH gave initial user level access, along with the first flag. Seventh, checking sudo permissions revealed that a certain binary could be run as root without a password. Eighth, GTFOBins provided the exact technique needed to abuse this binary and escalate to a full root shell. And finally, the second and final flag was retrieved once root access was achieved.
When you lay it out like this, it becomes pretty clear how each individual step naturally led into the next one. Nothing about this chain involved some super advanced zero day exploit or anything overly complicated. It was simply a chain of small misconfigurations, each one building on top of the last, eventually leading to full compromise of the system.
Lessons Learned from This Box
Every time I finish a box like this, I like to take a moment and think about what lessons can be applied not just to future CTF challenges, but also to real world systems that I might be responsible for securing one day. Here are a few key takeaways from this particular machine.
The first lesson is that anonymous FTP access should never be left enabled unless it is absolutely required for a specific business reason, and even then it should be heavily restricted. In this case, anonymous access directly led to leaking sensitive information, including a username and what turned out to be a usable password list.
The second lesson is about file hygiene. Sensitive files, even ones that might seem harmless like a personal task list, should never be left sitting on a publicly accessible service. Something as simple as a to do list note ended up leaking a valid username that was later used in a successful brute force attack.
The third lesson is around password policies. If a system allows weak or easily guessable passwords, even a relatively small wordlist combined with a known username can be enough to successfully brute force access. Strong, unique passwords combined with rate limiting or account lockout policies would have made this particular attack much harder to pull off.
The fourth lesson, and probably one of the most important ones from a system administration point of view, is about sudo configuration. Allowing a regular user to run a powerful binary like an archiving tool as root, without requiring a password, opened the door for a full privilege escalation. Sudo rules should always be configured with the principle of least privilege in mind, meaning users should only be allowed to run the exact commands they absolutely need, and nothing more.
Finally, this box was a great reminder of just how valuable a resource GTFOBins really is. Anyone working in this field, whether you are doing CTF challenges for fun or actual professional penetration testing engagements, should have this site bookmarked. It has saved me so much time across multiple different machines, and it is honestly one of those tools that turns what could be hours of research into just a quick lookup.
Tools Used in This Walkthrough
For anyone who wants a quick reference, here is a short list of all the tools that were used throughout this entire process. Nmap was used right at the start for scanning and service detection. The built in FTP client was used to connect anonymously and download files using the mget command. A standard SSH client was used both for the brute force target and for the actual login once credentials were obtained. Hydra was the tool of choice for performing the brute force attack against the SSH service. And finally, GTFOBins was used as a reference resource to figure out exactly how to abuse the sudo permission for privilege escalation.
None of these tools are particularly exotic or hard to find. They are all freely available, widely documented, and commonly used across the cybersecurity community. This is actually one of the things I love most about boxes like this one. You do not need access to expensive or obscure tools to succeed. Most of the time, basic enumeration combined with a solid understanding of common misconfigurations is more than enough to fully compromise a machine.
Final Thoughts
Looking back at this entire challenge, I think it served as a really solid refresher on a lot of fundamental enumeration and exploitation habits that everyone in this field should keep sharp. None of the individual steps here were particularly difficult on their own, but the real skill comes from being able to connect all the small pieces of information together into one complete attack path.
If you are someone who is just getting started with penetration testing or CTF challenges, my biggest piece of advice would be this. Slow down during the enumeration phase. Do not rush straight into trying exploits before you fully understand what services are running and what kind of information might already be sitting out in the open, just waiting to be discovered. Half of the work in boxes like this one is simply paying close attention to small details, like a stray text file on an FTP server or a single misconfigured sudo rule.
I hope this walkthrough was helpful for anyone working through a similar machine, or for anyone just starting out in their cybersecurity learning journey. Keep practicing, keep experimenting safely in legal lab environments, and most importantly, keep enjoying the process. That curiosity and persistence is honestly what separates people who get good at this field from people who give up early on.
Thanks for reading through this entire write up. If you found it useful, feel free to keep an eye out for more walkthroughs like this one in the future.
Contact
Questions or tips? Reach out anytime.
info@kaylacyberlabs.com
© 2026. All rights reserved.